 |


Tracks, Issue #004 -- Model Railroading Newsletter
January 1, 2020
Building Your Model Railroad
Newsletter - January, 2020
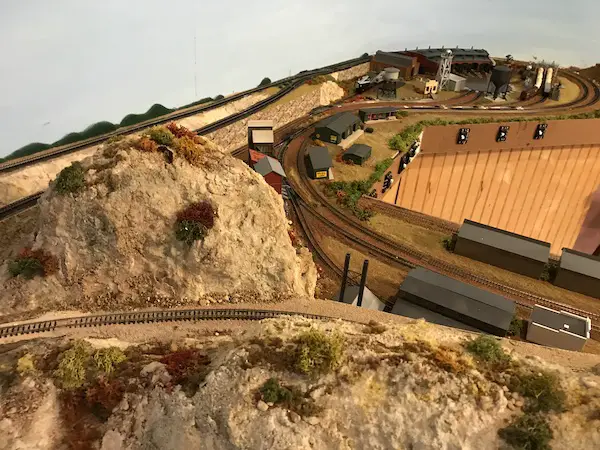
 Model Railroad Coal Depot
Articles in This Issue:
Using Illusions to Expand Your Layout
Great Model Railroad Videos from Trackside MR
More Pictures from Layouts We Love
Upcoming Train Shows and Events
WELCOME to the January issue of Tracks - a monthly newsletter published by Building Your Model Railroad, devoted to providing breaking news and tips to model railroaders of all ages and all scales in a quick and easy-to-read format. Resources are always credited where appropriate.
Whitelisting the email address of this newsletter is important. It assures that it doesn't end up in your Junk or Trash box every month. Please right click on the email address of the sender, copy the link and then go to your contacts program and paste it there as a new contact. You only have to do it once.
Note: √= sponsored link - See disclosure page for details. If you see a √ next to a link on this page or on the BYMRR.com site, that signals that the link is an ad. So if you click on it and purchase something, I might get a small (very small, I might add) commission on it. Just so you know.
Requests: If there are any particular subjects that you would like to see in the newsletter, please let us know at gjwarth@building-your-model-railroad.com. Even better, if you have a tip or something you would like to add yourself for the newsletter, please send it in! Use the form in the Comments section of the BYMRR website.
Back Issues: And don't forget, there is a huge amount of information in the 33 issues of the old newsletter called BYMR-Zine as well as previous issues of Tracks. Back Issues are available here.
Thank you for subscribing. We have lots of new tips and tricks in this issue to add to your model railroading pleasure. And please tell your friends about us. The more we can spread the word about model railroading, the better.
Photos: We're always looking for new photos for our Gallery pages. If you have photos of your layout that you would like to share with other model railroaders, I'd love to post them on the site. Send them in to photos@building-your-model-railroad.com.
Contributions Encouraged: If you have a tip, picture, video or an article about model railroading that you would like to share in this newsletter, please let me know. I'm always looking for more information.
DCC Wiring Tips
When converting from DC to √DCC, you may be tempted just to connect all your analog DC blocks to one command control station. This might work for small layouts, but it may not for larger ones. This is because the resistance across wires increases with distance and decreases with the gauge of the wire. The smaller gauge wires that you likely used to wire your DC layout will probably result in lower performance of your locomotives the farther they are from your power source. The performance will decrease further if you have more than one locomotive along with lights, crossing gates, signals and other devices connected as well.
As a result of this, you will probably need to rewire the basic power distribution to the layout with a pair of √12-14 gauge bus wires, each of a different color - one to use for connection to the positive rails and the other to connect to the negative rails.
Also for larger layouts, you should divide the layout into power districts with one pair of bus wires going to each district. Each pair of bus wires should then be connected to a circuit breaker. For Digitrax systems you can purchase a power distribution device called √PM42 , which is basically 4 circuit breakers in one device allowing you to connect up to 4 power districts.
The PM42 also automatically reverses polarity when necessary when locos are traveling from one power district to the next.
So now when you have a short in one area of the layout, you know what section to troubleshoot. The other parts of the layout are unaffected and are still operating.
Once your bus wires are in place, you can start attaching your track feeder wires (typically 18-24G) to the bus wires. There should be a connection from the bus to the track about every 6 feet or so. When doing so, make sure to connect the positive rail to the positive bus wire and the negative rail to the negative bus wire with every connection. Use wire colors to help you with this. I use red for positive and black for negative. The so-called √suitcase or T-type connectors make this process easier than trying to strip the bus wires manually at each connection. Or, if you prefer to solder the feeder wires to the bus, there is a √core stripping tool that you can use to easily strip a small section of the bus wire, then wrap the bare end of the feeder wire around the bare part of the bus wire, then solder.
References:
Juett, Mark, "Wiring for DC + DCC", NMRA Magazine, December, 2019, pp.42-46.
Expanding Your Layout
If you have a small layout, or even if it's a large one, if you wish to expand it and make it look bigger than it really is, here are 4 things you can do...
Add a √backdrop - If you pick the right one ( or if you paint your own) that matches the colors of your layout and your theme, and if it suggests a large area of land or industry behind your trains, your layout will immediately appear to be much larger than it is. The backdrop can add a lot of "information" that the viewer can recognize that immediately shows the setting, the location and perhaps even the era of your railroad.
Use structure facades - Add a warehouse or an industry or a whole city to your backdrop simply by using the front and/or side panels of the √structure kits that you buy in the store or online. It would be best to paint it first, put curtains in the windows, etc. just like you would otherwise, but now you only have to fix up the front of the building, not the whole thing. You could glue it to the backdrop as it is. But if you wanted to light up the "interior", just attach a thin strip of styrofoam (painted the same color as the structure) to the back of the facade on each side so there's enough space for a tiny LED light. In this case you will want to cover the entire back of the facade with black tape (except for the windows) so that the light does not "bleed" through the plastic, but only supplies light for the windows. If it's a large structure like an office building or hotel, keep in mind that not every window will be lit up so you can cover some of them with the tape in a random fashion.
Add a mirror - flat up against the backdrop so that when the viewer looks at the layout, it doubles the size of your scene. Make sure that when the viewer looks down at the mirror, the angle of the mirror is such that it does not distort the view, and make sure that the viewer doesn't not see himself in the mirror from the usual viewing angle. It can make your roads and bridges look miraculously longer, your ponds and rivers bigger, and your forests more expansive. You can use a √small mirror at the end of a road, for example, with the edges hidden by scenery or a long rectangular one that covers the entire back of your layout. Silver/chrome mirror sheets may serve the purpose well. If you have a 4x8 table layout you can put a divider-type of backdrop down the middle of the table and put a mirror on each side, instantly doubling the size of your layout on both sides of the divider.
Use forced perspective - Most people underestimate the effect this can have on your layout. If you have an HO layout, and add a few N scale buildings in the background, the viewer's perspective is that the layout is much bigger than it really is. You can't have the smaller structures too close to the larger structures or to the trains or the illusion is lost. But if the smaller building is a foot away behind the larger scale models, it looks like it's a thousand feet away. (I'm sure there is a mathematical formula for that calculation and I don't know what that is off-hand, but you get the idea.)
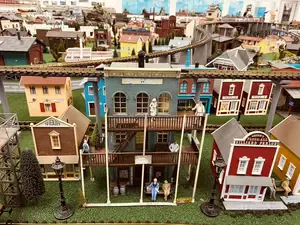
Details for Realism
Most of us are in a rush to get the basic things done on our layouts so we can get our trains running. Adding scenery and details to the layout are often felt to be secondary. I can understand that. We keep thinking that we can always add that later, but then we never seem to get to it. That's okay, if that's what you want. But I personally feel that completing the scenery and adding the details are the things that really bring the layout to life. It would be like line-drawing a picture but never painting it or finishing sketching in the details. Or like building the shell of a house but never finishing the inside. It would be empty and uninviting and could never really be a home unless it's finished.
So the scenery and the details are like creating a home for your trains. Without those things added, it's just an electrical project.
Adding the scenery helps tremendously, but it's still not enough. Once you get your basic scenery done, It would make it even better if you could go back and start adding little details to really bring it alive. The best thing to do is to take each scene or small section of your layout and go over it "an inch at a time". Put lights in your structures. Add √people, animals, cars, more trees and bushes, walkways, fences and gardens. Add swimmers and fishermen around ponds. Put up telephone poles and road signs. A few lighted signs, billboards, street lamps and traffic lights add a lot of realism, not to mention making your layout much more interesting and fun than it it would be otherwise.
Add decals to your buildings. They are easy to do and add a ton of fun and realism. If you are being true to your prototype, you already know what the labels should be, If you are freelancing, you can pick whatever names you want. Use names of your children or grandchildren to make them feel special. Use funny labels if you wish. Or use labels that are appropriate for your theme, era or locale.
Modeling Realistic Ballast
Here is a great little video on how to ballast and weather your tracks. The finished scene is downright awesome. My only concern is applying glue on and around the switches (turnouts). When I have done this in the past by accident, they frequently are unusable after that. Sometimes you can use a hobby knife to loosen up the moving parts, but sometimes I have just had to replace the whole turnout. So I usually try to avoid gluing too close to the moving parts of any turnout.
Great Model Railroading Blu-Rays and DVDs from Trackside
I have purchased several of these videos of great model railroads from Trackside and always find them to be very interesting and informative. To make them even better, the quality and resolution of the pictures and videos are the highest that I've seen anywhere. The owners travel all around the country searching for the best model railroads they can find. They interview the creator of each of the railroads and get the story behind each one and then professionally photograph the scenery and operations. The videos then provide the story and the visualization of the layout in considerable detail.
Here is a portion of one of there videos showing the Burlington Northern Woodinville Subdivision...
More Pics from the Layouts We Love
The Chesapeake Bay and Western Model Railroad - One of the largest HO scale model railroads in Virginia, nicely detailed and well-operated by a great club.
Horace and William Creek Railroad - Some of the most realistic scenery I've ever seen.
And from the Blue Ridge and Southern RR...


Videos for the Month
What's Neat This Week in Model Railroading #100
Modern BNSF Layout Tour
Milwaukee Trainfest 2019
MTH DSC O Scale Train Layout
Railroad 101 - An Informative Video on Railroad Signaling Systems.
Making a Winter Layout
Upcoming Train Shows and Events
Lots of model railroad displays are always available to see anytime of the year. If you're traveling, make sure you include a train show, museum or even a train hobby store to visit in your itinerary. The best way to find them is to enter an Internet search in your favorite search engine for "Train Shows" or "Train shows near _____" or "Train stores near _____".
Or click here to find train shows in your area...
Or go directly to the Trainshow.com website!
This is sure to be great fun for the entire family!
√Model Railroading Books!
Learn even more tips and techniques from these great
Model Railroading Books
Trains, tracks, electrical supplies, scenery, tools, paints, weathering supplies, buildings, locomotives with or without DCC, freight and passenger cars.
Available in all scales from 12 major manufactures!
Hope you enjoyed this issue of Tracks. Feel free to pass it on to your friends, family and other model railroaders. If you have a great tip or article that you would like to publish on the website, please let me know - The more, the better. Any comments or suggestions are always welcome. You can either go to the Comments/Contact Page and enter your suggestions there or contact me directly at gregwarth@building-your-model-railroad.com
Thank you for your support and for subscribing to the free newsletter for Building Your Model Railroad.
And, as always, thank you for visiting the BYMRR website at
https://www.bymrr.com. We are committed to providing all the newest techniques, tips and articles to help YOU build your own great model railroad!
-Greg Warth
Back to Home Page
Contact Me | Blog | Photos | References | Supplies | GiftShop | Sitemap | Search | Comment | Privacy Statement | Disclosures


Sign up for our free monthly newsletter ...

This unique Model Railroad Museum was established in November of 2024 as a non-profit community organization featuring ten operating model railroads in all the different major scales, a STEM Program for students, historical displays, group tours and clinics on how to develop your skills as a model railroader. It's definitely worth a visit if you're in the area.
Open 12-6 pm on all Fridays, Saturdays and Sundays through April, 2026. They will be moving to a new location after that. Will provide an update later this year.
Tracks Newsletter: Sign Up Here!

√ = ad or sponsored link
What's New on BYMRR.com?
Recent Articles
-
common-steam-locomotives-of-the-1940s-and-1950s
Apr 14, 26 04:27 PM
Common Steam locomotives of the 1940s and 1950s -
BYMRR-Store
Mar 22, 26 01:22 PM
 New model railroad store created by model railroaders for model railroaders.
 -
Model Railroad Supplies
Dec 16, 25 03:46 PM
 We have started a new store to help you build your layout and teach your youngsters about science with STEM products.
Building Your Model Railroad
